Quick start
SPS example usage
To start with SPS after installation:
Load package
Load the systemPipeShiny package in your R session.
library(systemPipeShiny)
## Loading required package: shiny
## Loading required package: spsUtil
## Loading required package: spsComps
## Loading required package: drawer
Initialize SPS project
Before launching the SPS application, a project environment needs to be created with the
following command.
spsInit()
For this demo, the project directory structure is written to a temporary directory on a user’s system. For a real project, it should be written to a defined and user controlled location on a system rather than a temporary directory.
sps_tmp_dir <- tempdir()
spsInit(app_path = sps_tmp_dir, change_wd = FALSE, project_name = "SPSProject")
## [SPS-INFO] 2021-12-14 23:53:38 Start to create a new SPS project
## [SPS-INFO] 2021-12-14 23:53:38 Create project under /tmp/RtmpGAaU3K/SPSProject
## [SPS-INFO] 2021-12-14 23:53:38 Now copy files
## [SPS-INFO] 2021-12-14 23:53:38 Create SPS database
## [SPS-INFO] 2021-12-14 23:53:38 Created SPS database method container
## [SPS-INFO] 2021-12-14 23:53:38 Creating SPS db...
## [SPS-DANGER] 2021-12-14 23:53:38 Done, Db created at '/tmp/RtmpGAaU3K/SPSProject/config/sps.db'. DO NOT share this file with others or upload to open access domains.
## [SPS-INFO] 2021-12-14 23:53:38 Key md5 90499a61aeea98b338debf236bd5aef4
## [SPS-INFO] 2021-12-14 23:53:38 SPS project setup done!
sps_dir <- file.path(sps_tmp_dir, "SPSProject")
SPS project structure
The file and directory structure of an SPS project is organized as follows.
SPS_xx/
├── server.R               |
├── global.R               | Most important server, UI and global files, unless special needs, `global.R` is the only file you need to edit manually
├── ui.R                   |
├── deploy.R               | Deploy helper file
├── config                 | Important app config files. Do not edit them by hand if you don't know
│   ├── sps.db             | SPS database
│   ├── sps_options.yaml   | SPS default option list
│   └── tabs.csv           | SPS tab registration information
├── data                   | App example data files
│   ├── xx.csv
├── R                      | All SPS additional tab files, helper R function, interactive guides files
│   ├── tab_xx.R
├── README.md
├── results                | Not in use for this current version, but you can store some data been generated from the app
│   └── README.md
└── www                    | Internet resources
    ├── css                | CSS files
    │   └── sps.css
    ├── img                | App image resources
    │   └── xx.png
    ├── js                 | Javascripts
    │   └── xx.js
    ├── loading_themes     | Loading screen files
    │   └── xx.html
    └── plot_list          | Image files for custom visualization tab thumbnails
        └── plot_xx.jpg
Launch SPS
By default, the working directory will be set inside the project folder automatically.
To launch the SPS Shiny application, one only needs to execute the following command.
shiny::runApp()
Alternatively, when using RStudio one can click the 
Run App button in the top right corner.
After the SPS app has been launched, clicking the “Continue to app” button on the welcome screen will open the main dashboard (Fig.2).

Figure 2A: SPS welcome page
Click on one of the big icons on the welcome page to choose for the module/tool you want to use, or use the lefe sidebar to navigate to different tabs.
SPS tabs
Within the functional categories, SPS functions are modularized into
sub-components, here referred to as SPS tabs that are similar to
menu tabs in other GUI applications that organize related and inter-connected
functionalies into groups. On the backend, SPS tabs are based on Shiny modules,
that are stored in separate files. This modular structure is highly extensible
and greatly simplifies the design of new SPS tabs by both users and/or developers.
Details about extending existing tabs and designing new ones are provided in
Manage tabs section on our website.
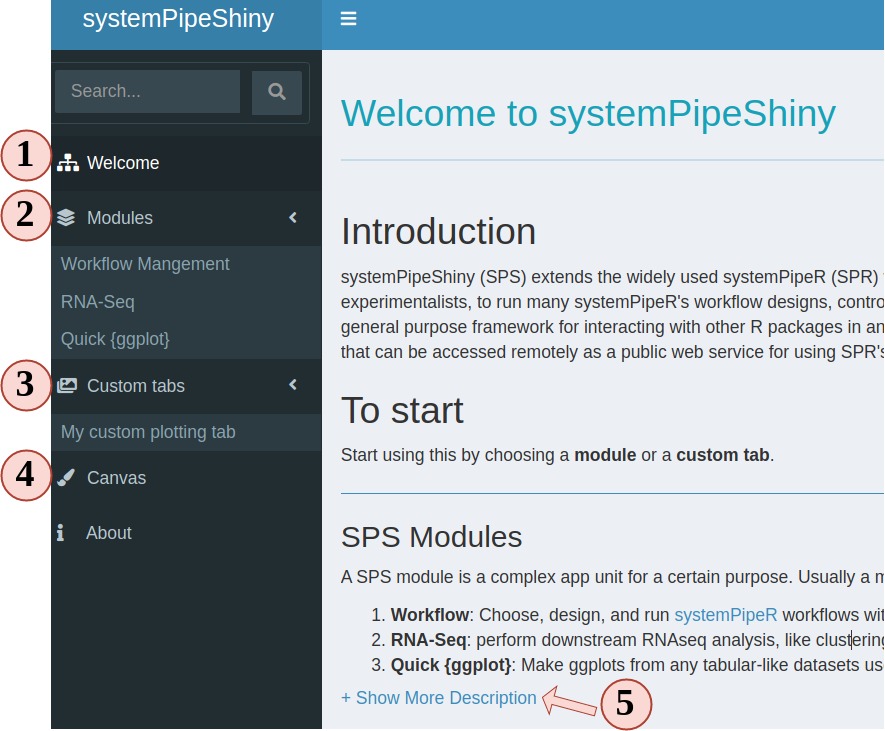
Figure 2B: Screenshot of SPS’ tabs.
- Welcome screen.
- Module tabs.
- User defined custom tabs.
- The Canvas tab.
- All SPS tabs has this description on top. It is highly recommend to click here to expand and read the full the description for the first time.
In addition, in Rstudio the global.R file will be automatically
opened when the SPS project is created. Custom changes can be made inside this file
before the app launches. Later we will discuss how to change and create new custom tabs
and change other settings in advanced sections.