Getting Started
Getting Started
Installation
systemPipeR
environment can be installed from the R console using the BiocManager::install
command. The associated data package systemPipeRdata
can be installed the same way. The latter is a helper package for generating systemPipeR
workflow environments with a single command containing all parameter files and
sample data required to quickly test and run workflows.
if (!requireNamespace("BiocManager", quietly = TRUE)) install.packages("BiocManager")
BiocManager::install("systemPipeR")
BiocManager::install("systemPipeRdata")
Please note that if you desire to use a third-party command-line tool, the particular tool and dependencies need to be installed and exported in your PATH. See details.
Loading package and documentation
library("systemPipeR")  # Loads the package
library(help = "systemPipeR")  # Lists package info
vignette("systemPipeR")  # Opens vignette
How to get help for systemPipeR
All questions about the package or any particular function should be posted to the Bioconductor support site https://support.bioconductor.org.
Please add the “systemPipeR” tag to your question, and the package authors will
automatically receive an alert.
We appreciate receiving reports of bugs in the functions or documentation and suggestions for improvement. For that, please consider opening an issue at GitHub.
Project structure
systemPipeR expects a project directory structure that consists of a directory
where users may store all the raw data, the results directory that will be reserved
for all the outfiles files or new output folders, and the parameters directory.
This structure allows reproducibility and collaboration across the data science team since internally relative paths are used. Users could transfer this project to a different location and still be able to run the entire workflow. Also, it increases efficiency and data management once the raw data is kept in a separate folder and avoids duplication.
Load sample data and workflow templates
The mini sample FASTQ files used by this overview vignette as well as the
associated workflow reporting vignettes can be loaded via the
systemPipeRdata package as shown below. The chosen data set
SRP010938 obtains 18
paired-end (PE) read sets from Arabidposis thaliana (Howard et al. 2013). To
minimize processing time during testing, each FASTQ file has been subsetted to
90,000-100,000 randomly sampled PE reads that map to the first 100,000
nucleotides of each chromosome of the A. thalina genome. The corresponding
reference genome sequence (FASTA) and its GFF annotation files (provided in the
same download) have been truncated accordingly. This way the entire test sample
data set requires less than 200MB disk storage space. A PE read set has been
chosen for this test data set for flexibility, because it can be used for
testing both types of analysis routines requiring either SE (single-end) reads
or PE reads.
The following generates a fully populated systemPipeR workflow environment
(here for RNA-Seq) in the current working directory of an R session. At this time
the package includes workflow templates for RNA-Seq, ChIP-Seq, VAR-Seq, and Ribo-Seq.
Templates for additional NGS applications will be provided in the future.
Directory Structure
systemPipeRdata, helper package, provides pre-configured workflows, reporting
templates, and sample data loaded as demonstrated below. With a single command,
the package allows creating the workflow environment containing the structure
described here (see Figure 1).
genWorkenvir(workflow = "rnaseq")
setwd("rnaseq")
Directory names are indicated in green. Users can change this structure as needed, but need to adjust the code in their workflows accordingly.
- workflow/ (e.g. myproject/)
- This is the root directory of the R session running the workflow.
- Run script ( *.Rmd) and sample annotation (targets.txt) files are located here.
- Note, this directory can have any name (e.g. myproject). Changing its name does not require any modifications in the run script(s).
- Important subdirectories:
- param/
- param/cwl/: This subdirectory stores all the parameter and configuration files. To organize workflows, each can have its own subdirectory, where all
*.cwland*input.ymlfiles need to be in the same subdirectory.
- param/cwl/: This subdirectory stores all the parameter and configuration files. To organize workflows, each can have its own subdirectory, where all
- data/
- Raw data (e.g. FASTQ files)
- FASTA file of reference (e.g. reference genome)
- Annotation files
- Metadata
- etc.
- results/
- Analysis results are usually written to this directory, including: alignment, variant and peak files (BAM, VCF, BED); tabular result files; and image/plot files.
- Note, the user has the option to organize results files for a given sample and analysis step in a separate subdirectory.
- param/
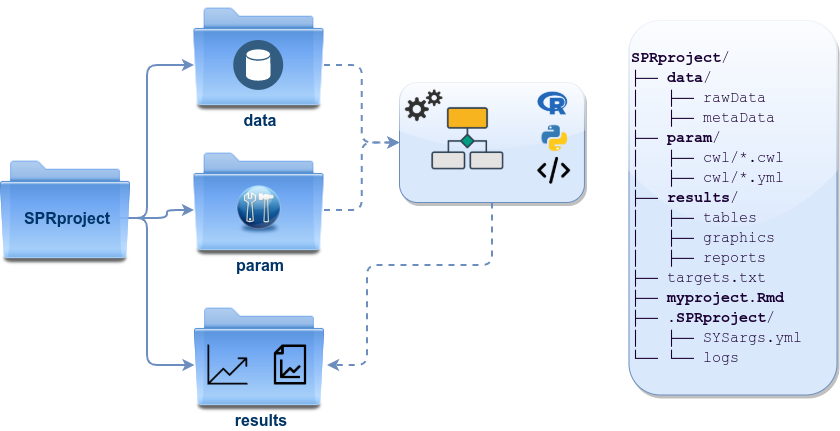
Figure 1: *systemPipeR’s* preconfigured directory structure.
The following parameter files are included in each workflow template:
targets.txt: initial one provided by user; downstreamtargets_*.txtfiles are generated automatically*.param/cwl: defines parameter for input/output file operations, e.g.:hisat2/hisat2-mapping-se.cwlhisat2/hisat2-mapping-se.yml
- Configuration files for computer cluster environments (skip on single machines):
.batchtools.conf.R: defines the type of scheduler forbatchtoolspointing to template file of cluster, and located in user’s home directorybatchtools.*.tmpl: specifies parameters of scheduler used by a system, e.g. Torque, SGE, Slurm, etc.
Structure of initial targets file
The targets file defines all input files (e.g. FASTQ, BAM, BCF) and sample
comparisons of an analysis workflow. It can, also, store any number of descriptive
information for each sample used in the workflow.
The following shows the format of a sample targets file included in the
package. It also can be viewed and downloaded
from systemPipeR’s GitHub repository here.
Please note that here it is represented a tabular file, however systemPipeR can
import the inputs information from a YAML files, as well as
SummarizedExperiment object. For more details on how to create custom targets,
please find here.
Users should note here, the usage of targets files is optional when using
systemPipeR's new workflow management interface. They can be replaced by a standard YAML
input file used by CWL. Since for organizing experimental variables targets
files are extremely useful and user-friendly. Thus, we encourage users to keep using
them.
Structure of targets file for single-end (SE) samples
In a target file with a single type of input files, here FASTQ files of
single-end (SE) reads, the first column describe the path and the second column
represents a unique id name for each sample. The third column called Factor
represents the biological replicates. All subsequent columns are additional
information, and any number of extra columns can be added as needed.
targetspath <- system.file("extdata", "targets.txt", package = "systemPipeR")
showDF(read.delim(targetspath, comment.char = "#"))
## Loading required namespace: DT
To work with custom data, users need to generate a targets file containing
the paths to their own FASTQ files and then provide under targetspath the
path to the corresponding targets file.
Structure of targets file for paired-end (PE) samples
For paired-end (PE) samples, the structure of the targets file is similar, where
users need to provide two FASTQ path columns: FileName1 and FileName2
with the paths to the PE FASTQ files.
targetspath <- system.file("extdata", "targetsPE.txt", package = "systemPipeR")
showDF(read.delim(targetspath, comment.char = "#"))
Sample comparisons
Sample comparisons are defined in the header lines of the targets file
starting with ‘# <CMP>.’
readLines(targetspath)[1:4]
## [1] "# Project ID: Arabidopsis - Pseudomonas alternative splicing study (SRA: SRP010938; PMID: 24098335)"
## [2] "# The following line(s) allow to specify the contrasts needed for comparative analyses, such as DEG identification. All possible comparisons can be specified with 'CMPset: ALL'."
## [3] "# <CMP> CMPset1: M1-A1, M1-V1, A1-V1, M6-A6, M6-V6, A6-V6, M12-A12, M12-V12, A12-V12"
## [4] "# <CMP> CMPset2: ALL"
The function readComp imports the comparison information and stores it in a
list. Alternatively, readComp can obtain the comparison information from
the corresponding SYSargsList step (see below). Note, these header lines are
optional. They are mainly useful for controlling comparative analyses according
to certain biological expectations, such as identifying differentially expressed
genes in RNA-Seq experiments based on simple pair-wise comparisons.
readComp(file = targetspath, format = "vector", delim = "-")
## $CMPset1
## [1] "M1-A1"   "M1-V1"   "A1-V1"   "M6-A6"   "M6-V6"   "A6-V6"   "M12-A12"
## [8] "M12-V12" "A12-V12"
##
## $CMPset2
##  [1] "M1-A1"   "M1-V1"   "M1-M6"   "M1-A6"   "M1-V6"   "M1-M12"  "M1-A12"
##  [8] "M1-V12"  "A1-V1"   "A1-M6"   "A1-A6"   "A1-V6"   "A1-M12"  "A1-A12"
## [15] "A1-V12"  "V1-M6"   "V1-A6"   "V1-V6"   "V1-M12"  "V1-A12"  "V1-V12"
## [22] "M6-A6"   "M6-V6"   "M6-M12"  "M6-A12"  "M6-V12"  "A6-V6"   "A6-M12"
## [29] "A6-A12"  "A6-V12"  "V6-M12"  "V6-A12"  "V6-V12"  "M12-A12" "M12-V12"
## [36] "A12-V12"
Downstream targets files description
After the step which required the initial targets file information, the downstream
targets files are created automatically (see Figure 2).
Each step that uses the previous step outfiles as an input, the new targets input
will be managed internally by the workflow instances, establishing connectivity
among the steps in the workflow.
systemPipeR provides features to automatically and systematically build this
connection, providing security that all the samples will be managed efficiently
and reproducibly.
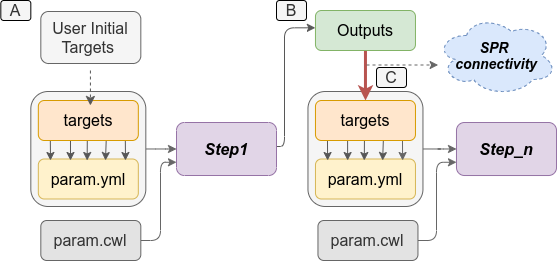
Figure 2: *`systemPipeR`* automatically creates the downstream `targets` files based on the previous steps outfiles. A) Usually, users provide the initial `targets` files, and this step will generate some outfiles, as demonstrated on B. Then, those files are used to build the new `targets` files as inputs in the next step. *`systemPipeR`* (C) manages this connectivity among the steps automatically for the users.
Structure of the new parameters files
The parameters and configuration required for running command-line software are
provided by the widely used community standard Common Workflow Language (CWL)
(Amstutz et al. 2016), which describes parameters analysis workflows in a generic
and reproducible manner. For R-based workflow steps, param files are not required.
For a complete overview of the CWL syntax, please see the section below.
Also, we have a dedicated section explain how to systemPipeR establish the
connection between the CWL parameters files and the targets files. Please see here.
References
Amstutz, Peter, Michael R Crusoe, Nebojša Tijanić, Brad Chapman, John Chilton, Michael Heuer, Andrey Kartashov, et al. 2016. “Common Workflow Language, V1.0,” July. https://doi.org/10.6084/m9.figshare.3115156.v2.
Howard, Brian E, Qiwen Hu, Ahmet Can Babaoglu, Manan Chandra, Monica Borghi, Xiaoping Tan, Luyan He, et al. 2013. “High-Throughput RNA Sequencing of Pseudomonas-Infected Arabidopsis Reveals Hidden Transcriptome Complexity and Novel Splice Variants.” PLoS One 8 (10): e74183. https://doi.org/10.1371/journal.pone.0074183.