Workflow
Workflow management
The workflow management module in SPS allows one to modify or create the
configuration files required for running data analysis workflows in
systemPipeR (SPR). This includes
three types of important files: a sample metadata (targets) file, a
workflow file (in R Markdown format) defining the workflow steps, and workflow running
files in Common Workflow Language (CWL){blk} format. In SPS, one can easily create
these files under the “Workflow Management” module, located in navigation bar
on the left of the dashboard.
The current version of SPS allows to:
- create a workflow environment;
- create and/or check the format of targets / workflow / CWL files;
- download the prepared workflow files to run elsewhere, like a cluster;
- directly execute the workflow from SPS.
1. setup a workflow
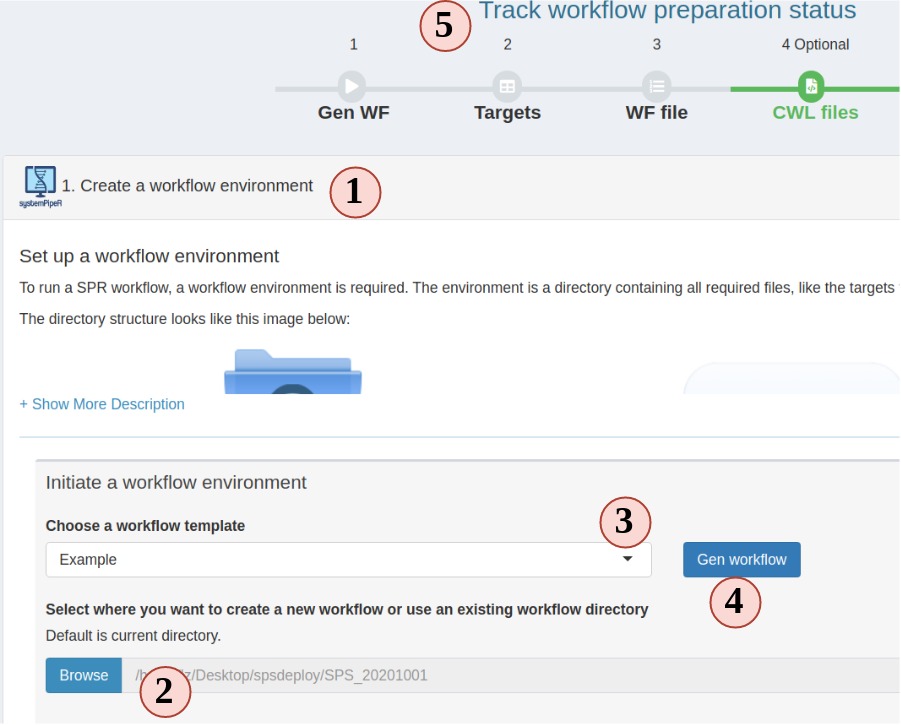
Figure 3. A. Workflow Management - Targets File
- In the workflow module, read the instructions and choose step 1. Step 1 should be automatically opened for you on start.
- Choose a folder where you want to create the workflow environment.
- Choose a workflow template. These are SPR workflows and mainly are next-generation sequencing workflows.
- Click “Gen workflow” to create the workflow project.
- You should see a pop-up saying about the project path and other information. Clicking the pop-up will jump you to the step 2. The status tracker and banner for step 1 should all turn green.
2. Prepare the targets file
The targets file defines all input file paths and other sample information of
analysis workflows. To better undertand the structure of this file, one can
consult the “Structure of targets
file”
section in the SPR vignette. Essentially, this is the tabular file representation
of the colData slot in an SummarizedExperiment object which stores sample
IDs and other meta information.
The following step-by-step instructions explain how to create and/or modify targets files using RNA-Seq as an example (Fig.3 A):
- Your project targets file is loaded for you, but you can choose to upload a different one.
- You can edit, right click to add/remove rows/columns (The first row is treated as column names).
- SPR target file includes a header block, that can also be edited in the SPS app. Each headers needs to start with a “#”. Header is useful for workflows with DEG analysis in current SPR. You can define sample comparison groups here. Leave it as default for other projects.
- The section on the left provides sample statistics and information whether files exist inside the workflow project’s
datadirectory. Choose any column you want from the dropdown to check and watch the statistics bar change in this section. - statistic status bar.
- Clicking on “Add to task” can help you to check if your target file has any formatting problem. You should see a green success pop-up if everything is right. Now your target file is ready and you can click “save” to download it and later use in other SPR projects.
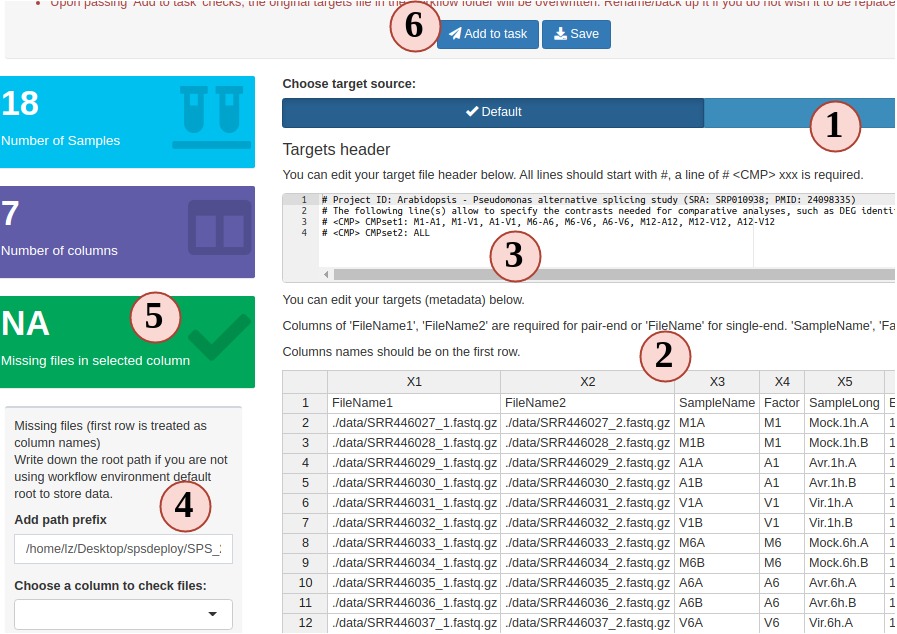
Figure 3. A. Workflow Management - Targets File
3. Prepare a workflow object
In SPR, workflows are defined in Rmarkdown files, you can read details and obtain them here.
Now let us follow the order below to see how SPS helps you to prepare a workflow file for a RNAseq project (Fig.3 B):
- The left panal is the workflow designer. All steps from the template from your choosen workflow will be displayed here. The arrows indicates the execution order of the entire workflow.
- All the steps are draggable. Drag and place steps to a different place to change the order. Note: if you change the order, it may break the dependency. SPS will check this for you. After changing orders, steps marked in pink mean these steps are broken. You need to fix the dependency before you can save it.
- To config a step, such as, changing name, fixing dependency. Click the button next to each step, a modal will show up and you can make changes there.
- To add a step, click the button. There, you will have more options to choose which will be explained in the next figure.
- History is enabled in this designer, you can undo or redo anytime you want. Current SPS stores max 100 steps of history for you.
- To delete a step, simply drag it to the trash can.
- After you are done with all edits, click here to save the workflow so we can run or download it in the next major step.
- On the right side is the workflow dependency plot. This plot shows how each step is connected and the expected execution order. It does not mean the the workflow will be run in the same order. The order is determined by the order you have in the left-side designer.
- Enlarge the left or right panel. If you have a small monitor screen, this can help.
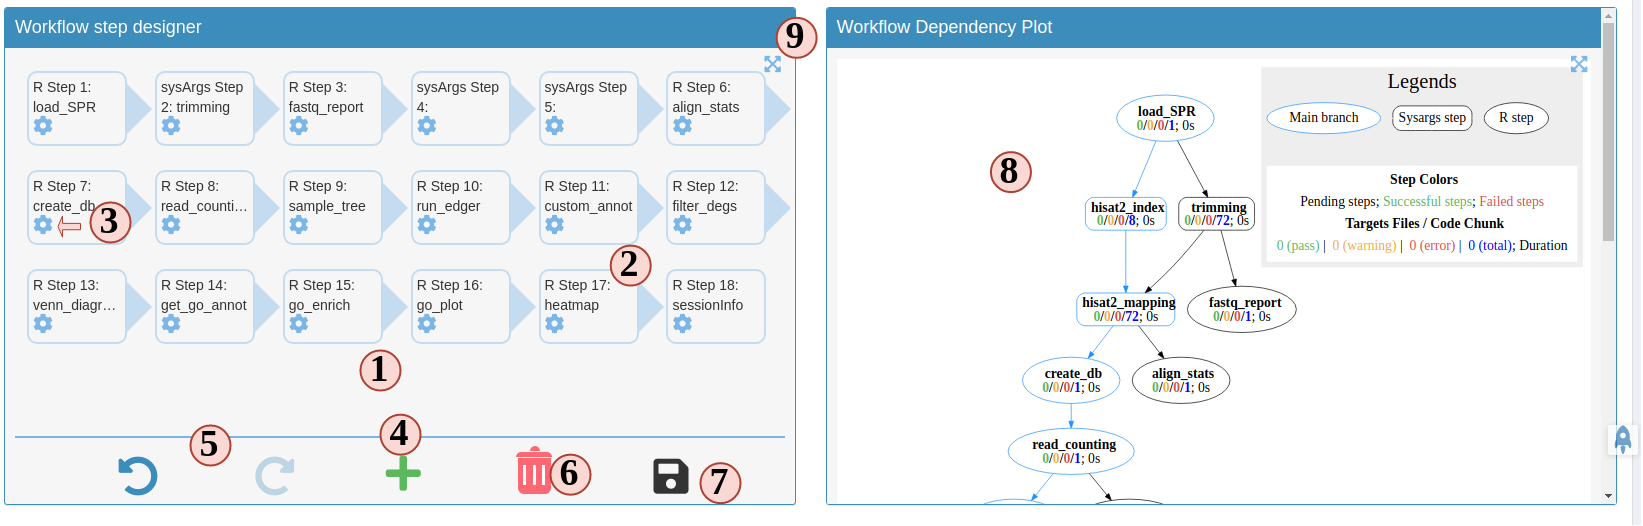
Figure 3. B.1 Workflow Management - Workflow Designer
R step and sysArgs step
On the designer there are two types of workflow steps. One is R step, which only has R code. Then it is the time to run these R steps, they will be run in the same R session as the Shiny app and in a separate environment different than your global environment. In other words, all R steps are in the same environment, they can communicate with each other, meaning you can define a variable in one step and use it in other R steps.
sysArgs steps, on the other hand, is different, as its name suggest, it will invoke system commands (like bash) when run. Details of how to create these steps will be discussed on Fig 3.B.5, Fig 3.B.6.
View and modify steps
Current SPS allows users to view some basic information of R steps like, step name, select dependency(ies). Besides, users are welcome to change the R code they want in the second sub-tab (Fig 3.B.2).
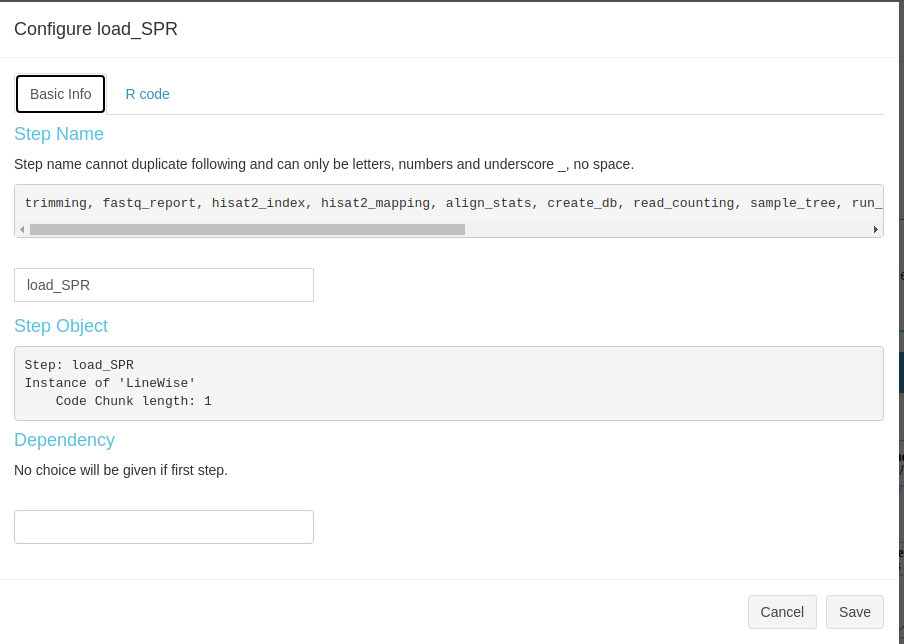
Figure 3. B.2 Workflow Management - config R
Modification of sysArgs steps is limited to step name and dependency. However, this kind steps will provide more information to view, like the files that were used to create this step, raw commandline code that will be run, targets (metadata) and output dataframes. This information is distributed in different subtabs (Fig 3.B.3).
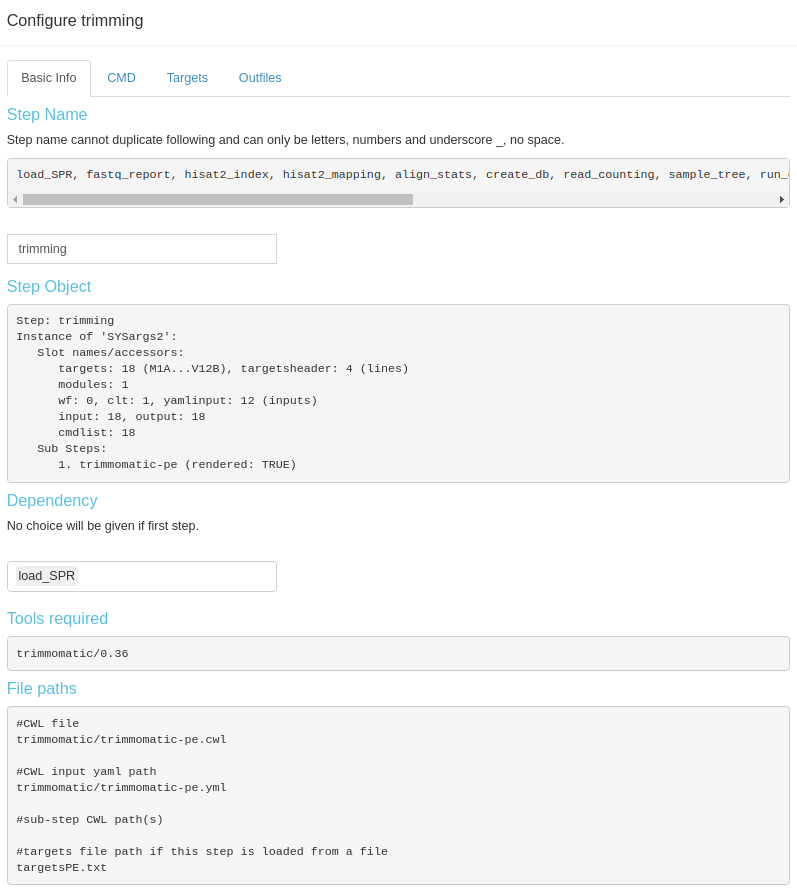
Figure 3. B.3 Workflow Management - config sysArgs
Create a new step
After clicking the button in Fig 3.B.1, you would need to choose whether to create an R or sysArgs step (Figure 3. B.5).

Figure 3. B.5 Workflow Management - Choose new step type
Create a new R step
Create a new R step is simple. In the modal, type the step name, R code, and select dependency (Fig 3. B.6).
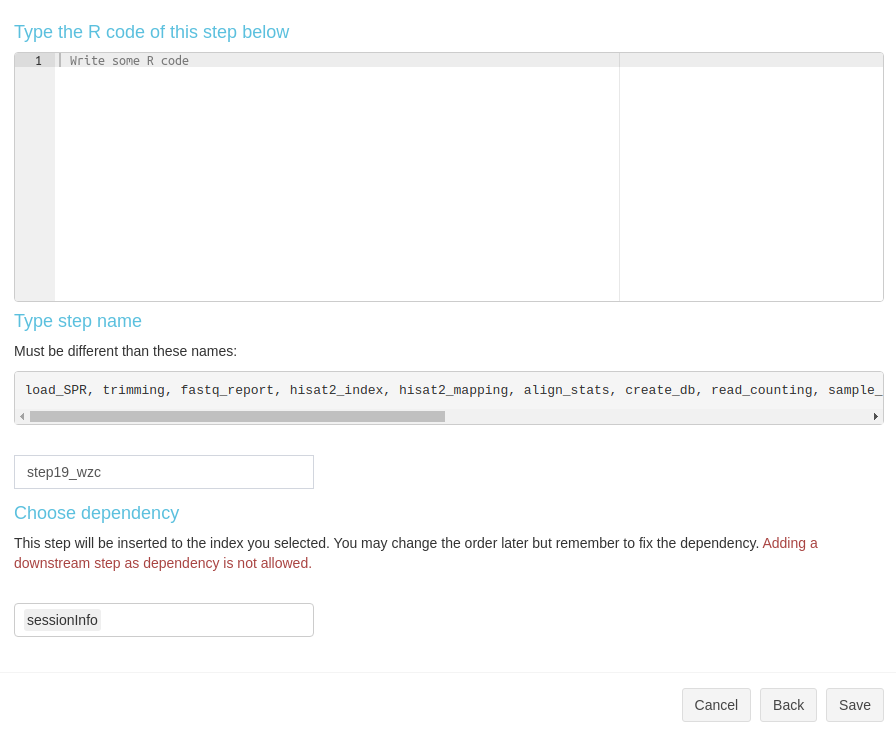
Figure 3. B.6 Workflow Management - New R step
Create a new sysArgs step
Basic info for sysArgs step is simialr to R step (Fig 3. B.7).
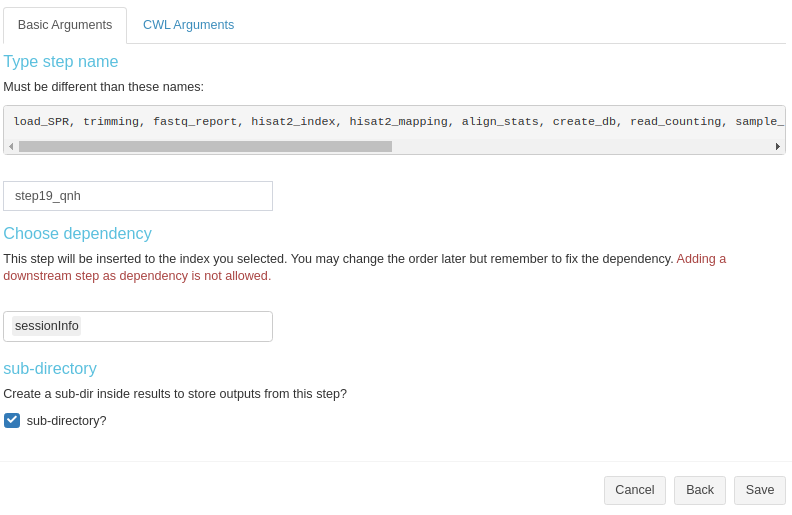
Figure 3. B.7 Workflow Management - New sysArgs step
To generate some commandline line, there are three items need to be prepared: targets, CWL file, CWL yaml file (Fig.3. B.8).
- targets: metadata that will populate the basecommand sample-wisely. Columns in targets will be injected into CWL yaml and then, yaml file will replace variables in parsed CWL base command.
- CWL file: provide the base command.
- CWL yaml file: provides CWL variables.
- Choose the targets source. Targets in SPR workflow steps can come from either a fresh file or inherit from a previous sysArg step(s) (output from a previous step can become input of the next(s)).
- If you choose from a previous step(s), select the steps from here. If a new file, upload here.
- Then, the targets or inherited targets table is displayed here for you to take a look. Later we will use these column to replace CWL yaml variables.
- Choose the CWL and CWL yaml file you want to use. All
.cwland.yamlor.ymlfiles inside your workflow projectparam/cwlfolder will be listed here. You could drop more of these files you want to this folder. They will become aviable the next time you create a new step. - If you have all the three items, you can start to use which column from the targets to replace each CWL yaml variables.
- Try to parse the command, see if the results is as what you expect. If not, try to change options above and try again.
- If everything looks fine, save and create the step.

Figure 3. B.8 Workflow Management - New sysArgs step
4. Prepare CWL files (optional)
In the new version of SPR, all individual system workflow steps are called by the CWL files. Each SPR workflow has a set of CWL files and normally users do not need to make any change. In case you want to learn more about CWL and create some new CWL files, Step 4 is a good place to practice.
To run a CWL step in SPR, 3 files are required:
- targets: to determine how many samples will be run and sample names.
- CWL running file: can be translated to bash code;
- CWL input: variables to inject into the running file
SPR is the parser between R and CWL by injecting sample information from targets
to CWL input file and then CWL parser translates it to bash code.
- Most people are not familiar this part, so read instructions carefully.
- Your project targets has been loaded for you, and an example CWL running and input for hisat2 is also loaded for you. Directly parse the code. See what commandline code you get.
- Change the targets injecting column, and parse again, see what has changed.
- You can edit the CWL running and input files
- Try to parse the new file and see what has changed.
- If new CWL files has been created, you can edit workflow Rmd files by adding your new steps.
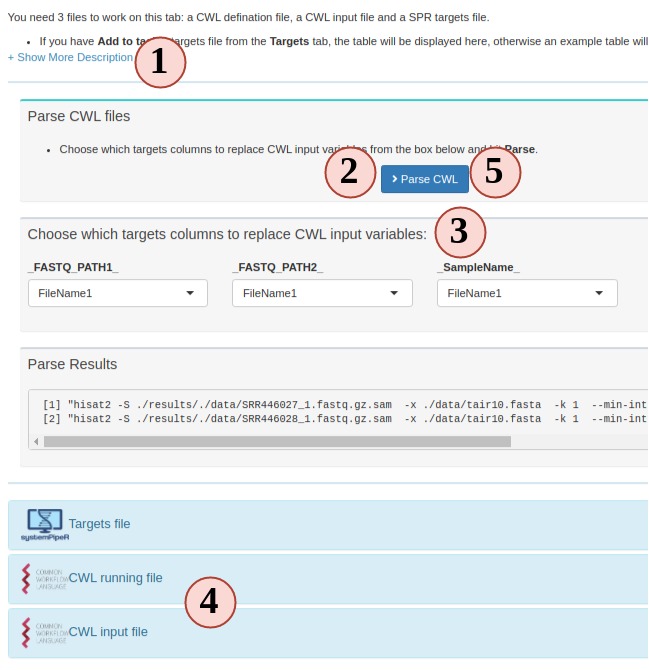
Figure 3. C. Workflow Management - CWL File
5. Run or finish workflow preparation
Up until this step, congratulations, the workflow is prepared. You can choose to download the workflow project files as a bundle or continue to run the workflow.
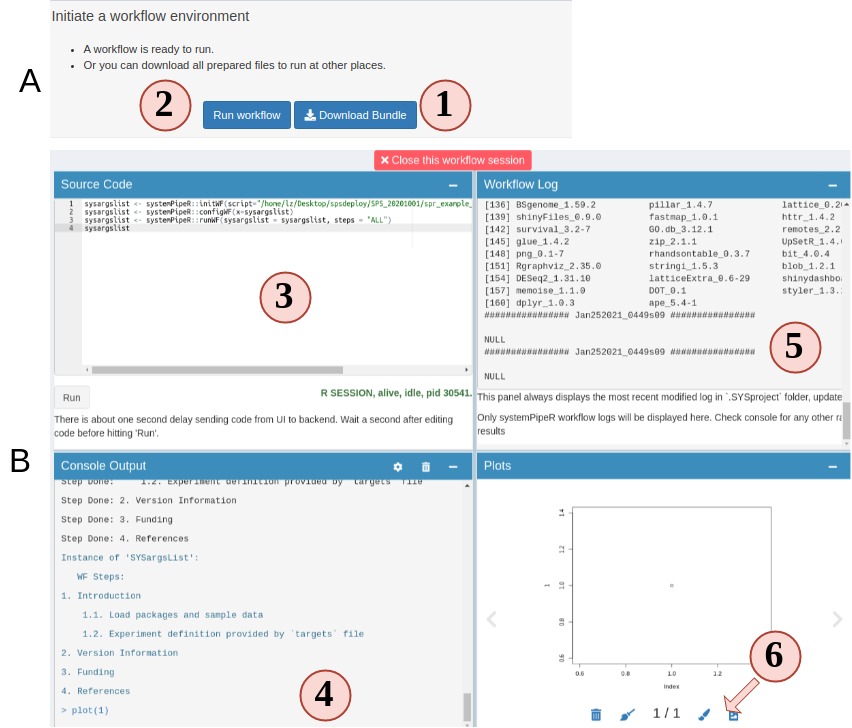
Figure 4.A.B Workflow Runner
- On step 5 you can choose to download the prepared workflow or directly run the workflow. However, if you do not have the required commandline tools, workflow will most likely fail. Make sure you system has these tools (Read about these tools).
- Open up the runner. It is a “Rstudio-like” interface.
- Code editor. Required workflow running code is pre-entered for you. You can simply hit “Run” to start. Of course, you can delete the default code and run random R code.
- Output R console.
- Workflow running log and real-time updated progress workflow plot.
- View any plot output. and send a copy of your current plot to SPS Canvas tab or download it.
App security
Running the workflow may introduce some security concerns. Read App Security for more details.
is_demo option
The is_demo option will impact the workflow
module.
TRUE: you are not deploying the app for production purpose. It is just a show case. Under this option, users who are trying to create a workflow will be locked inside a temp directory and every time they start a new session, they will be assigned to a new temp directory. This is useful if many people want to try the app the same time, so they will have different private environments, and the temp directory will be removed after the Shiny session is closed.FALSE: you are using the app on your own local computer or use it in a production environment. WF module will have full access to the sever storage system and users can choose any place they have permissions to create the workflow session.