Deploy
How to deploy the application
The easiest way to deploy SPS is shinyapps.io{blk}. To get started, it is required to create a shinyapps.io account. Please follow this tutorial{blk} with all the instructions to create an account. There are other ways to deploy, like AWS or Google Cloud with a custom Shiny server. There are a lot of tutorials to deploy the app other than shinyapps.io. We only use shinyapps.io as the example here to discuss how to deploy.
Get started
After you have created a SPS project, it is in a deploy-ready state, which means
you can deploy it as soon as you create the project.
We have created some important helper code in deploy.R under the project root for you.
- Read the tutorial{blk}
- After you have the accounts and token set up according to the tutorial, open
deploy.R.-
If you have used Bioconductor packages (mostly likely yes, unless you do not use the default modules), run the options line in R console before deploy, which is this
options(repos = BiocManager::repositories()) -
If you want to use develop version of Bioconductor packages (not recommended), uncomment following lines and follow the instructions in the file.
# repos <- BiocManager::repositories() # devel <- "3.13" # repos[length(repos) + 1] <- paste0("https://bioconductor.org/packages/", devel, "/bioc") # names(repos)[length(repos)] <- "BioC" # options(repos = repos) # getOption("repos") -
If you wish shinyapps.io to install SPS modules, copy and uncomment following lines for the modules to
global.Rfile below the line# load additional libraries that you want to use below.## Workflow module # requireNamespace("DOT"); requireNamespace("networkD3"); requireNamespace("pushbar") # requireNamespace("readr"); requireNamespace("rhandsontable"); requireNamespace("shinyTree") # requireNamespace("systemPipeR"); requireNamespace("systemPipeRdata"); requireNamespace("zip") ## RNA-Seq module # requireNamespace("DESeq2"); requireNamespace("Rtsne"); requireNamespace("SummarizedExperiment") # requireNamespace("UpSetR"); requireNamespace("ape"); requireNamespace("ggtree") # requireNamespace("glmpca"); requireNamespace("pheatmap"); requireNamespace("systemPipeR") ## Quick ggplot module # requireNamespace("esquisse") -
The last section in
deploy.Ris some helper code to set up the account and deploy the app programmatically. If you use the tutorial{blk}, there is no need to do this section. -
Save your changes in the
global.R.
-
Deploy in Rstudio
We recommend you to deploy the app with Rstudio. If you have set up your shinyapps.io account, we are ready to go.
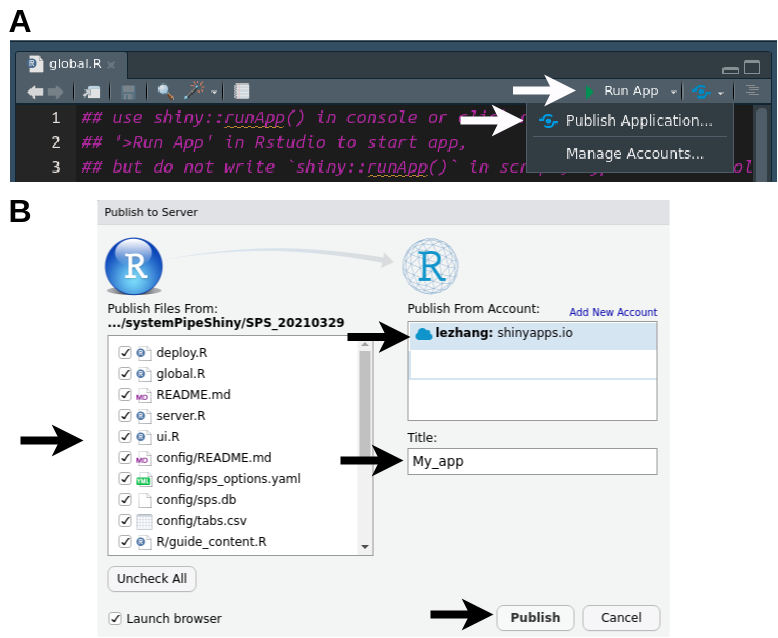
A
- Open
global.Rin Rstudio, use the “Run App” button to make sure your app can be run without problems locally. - Run
options(repos = BiocManager::repositories())and other Bioconductor set up code as listed above. - Click the button next to “Run App” and choose “Publish Application…”
B
- If you have set up your account correctly, you should see your account to the right panel.
- Select all the files of your SPS project.
- Change the app “Title” to what you want.
- hit “Publish”.
RAM requirement
If you wish to load the workflow and/or RNAseq module(s) on shinyapps.io, you need at least 2GB of memory. Unfortunately, these 2 modules depend heavily on Bioconductor packages and these packages are not light-weighted. The max RAM for free account on shinyapps.io is 1GB which means you either need to upgrade your account or use other server to deploy your app.
If you decide to not load these modules which will allow you to deploy the app
with a free account, change the settings to unload these modules in
app options in global.R.